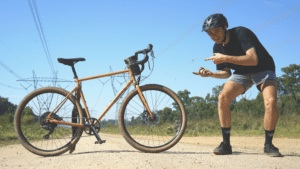
Aero Bars are gaining popularity in ultra racing events, and bikepackers are seeing the use in them for longer distance adventures. When I hear of aero bars I often think of time trial bikes and using them for optimal speed advantages. But it seems that for bikepacking setups they are popular due to their comfort factor.
I personally love talking about all the different types of handlebars for bike travel, as there are so many to choose from and they all offer some great advantages. If you have not read my post about butterfly bars you should also check that out.
It is wonderful to see so many options for the bike traveller, spending so many hours in the saddle day in day out, it seems almost essential to have a handlebar setup that offers multiple hand positions to insure ultimate comfort while on the road.
Why Use Aero Bars For Bikepacking?
Reasons Why You Should Get Some
- Reduce your resistance from the wind, resulting in a more efficient ride in terms of aerodynamics. They are great if you want to travel faster with the same amount of effort, and hep in covering a larger distance in a day. When battling head winds using a upright riding position with butterfly bars for example you are really exposed and it slows you down quite a lot. However aero bars get you down very low allowing you to cut through the wind more efficiently.
- You free up space on your handlebars giving you more options for mounting gear and gadgets. With aero bars on your bike you have more real estate to mount feedbags and other gear when bikepacking.
- More hand positions and locations to move about, stretching the body. Reducing the constant strain on long rides where you hand contacts a normal drop bar setup. Further reducing strain on your wrists and arms.
- The Aero Bar position also slightly lifts your bum of the saddle meaning less of an impact force.
- These bars would also be useful not just for riding but if you are resourceful they would also make a great clothes drying rack. #multipurpose
Things To Consider
- Depending on the setup, it may pose a problem when you flip your bike upside down, if you are using it as a bike + tarp setup.
- You may get funny looks from people
- Depending on your current bike fit they may not be comfortable.
- QUICK TIP * Make sure you try them out before you go on a big tour or bike trip
- They must be adjusted just right to prevent aches and pains
- Extra weight added to the bike.
- Aero bars take some time and riding experience to gain good stability and control, don’t expect to be able to go down steep descents first try they will take some getting use to, just like most things.
- It seems that some bike travellers experienced arm fatigue rather quickly when using aero bars and would have to switch back to the upright position. (But then it goes back to the idea of making sure you dial in an appropriate position that suits your body and is comfortable for you.)
Try And Avoid These Mistakes
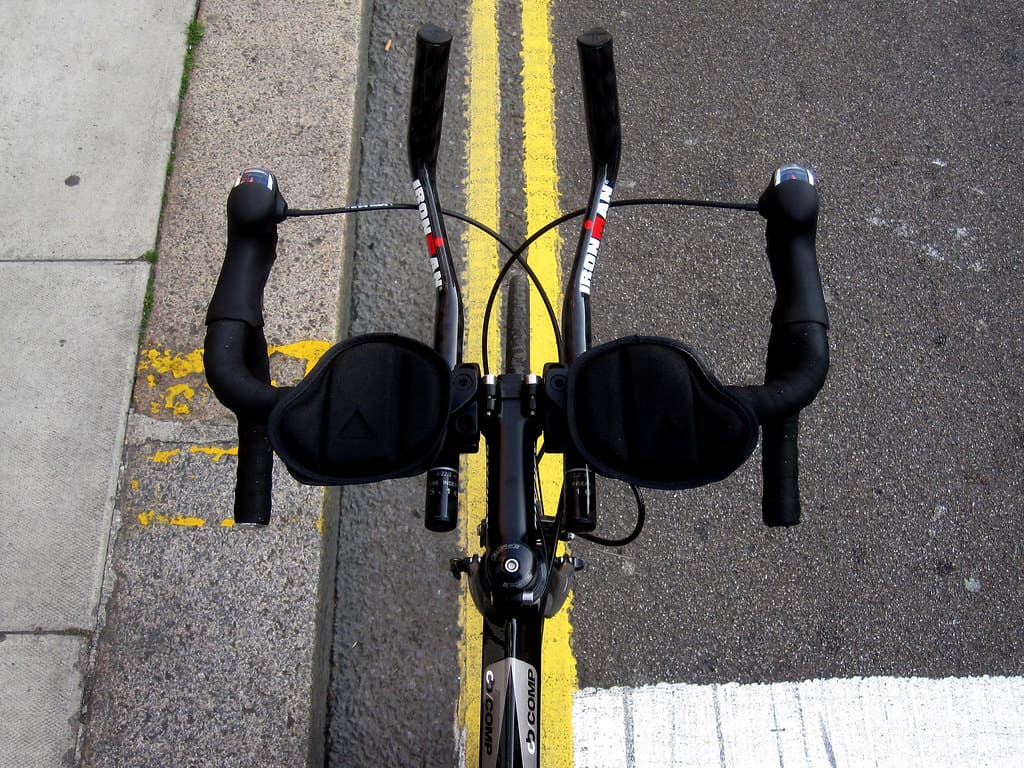
- Having your aero bars too far out in front, this is not good for aerodynamics anyway because you can’t get your elbows together if they’re not bent much. Reason why bars like the Syntace C2 have the pads behind the base bar instead of directly over it.
- Try and get aero bars that are more curved, typically at the ends. As the bars that are almost straight, result in your wrists bending unnaturally which would be uncomfortable to maintain that position over long rides.
- Not putting the seat forward enough. As the more your body is forward, your hips will rotate. If the saddle is back too far then it may result in discomfort.
How To Choose Aero Handlebars for Bikepacking?
It seems more practical to choose clip on style aero bars for your bikepacking setup compared to completely replacing your setup with complete time trail handlebars that include a aero bar, as this means you have to change all your gearing and other parts over, and each time you wish to change back to normal flat bars or another bar setup you will have to spend some amount of time changing them each time.
With some clip on bars fitting on top of the main handlebar, offer a more upright position, which seems like the best solution for longer rides as you want to have a more upright posture. Then there is other bars fitting underneath, therefore positioning you further down, which would be uncomfortable for longer periods of time in that position.
When looking at aero bars for your bikepacking setup, also consider bars that have adjustable pads. To change the height in relation to the aero bars and the width. As it may be more comfortable with your elbows resting out wider.
Also again you want bar extensions that have more curve and bend. The more the bar kicks up at the end it will give you a more upright position and feel more comfortable overall.
Different Types of Aero Bars
Quick-release – Redshift Aero Bars
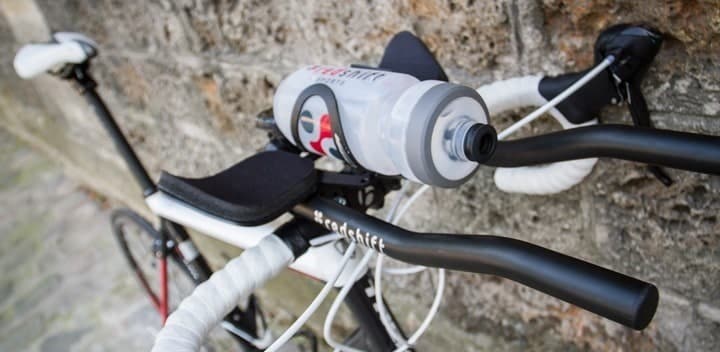
These are interesting Aero Bars that allow for a quick-release attachment to your current handlebar setup. (Aluminum $179.99 or Carbon $249.99)
- Allows you to attach or remove the aero bars in a few seconds.
- No tools required to remove or attach them.
- The bars always attach in the same orientation.
- Extensions are available in aluminum and carbon, as well as L-Bend or S-Bend shapes.
- Secondary safety release mechanism prevents accidental release.
- Massive adjustability lets you fine-tune your fit – extension length, armpad fore-aft, armpad width (Extension Riser Kit sold separately)
- Fits 31.8mm handlebars (26.0 mm Shim Kit sold separately)
- Along with the Redshift Dual-Position Seatpost, provides an optimized aero riding position on your road bike.
Go check out Solo Bikepacker’s video they did on gear testing the Redshift Aero Bars. These Aero Bars seem really cool, you even get the option for a suspension head set which reduces some shock on the trails.
Bars with fold up armrest
Fold up Aero Bar armrests offer more room on the handlebars for gadgets and such, on handlebars that are more narrow. It is not recommended to get fold up armrests if you are still figuring out a comfortable aero bar riding position. So work out what position works best for you first.
Mini Aero Bars
Mini Aero bars are not the best option for bikepacking aero bars, how short they are offer really minimal comfort over the long haul. They are mostly designed for short sprint riding. They could work for you if you use them with very minimal amounts of weight on them. But not entirely recommended for long adventures.
BarYak Expedition
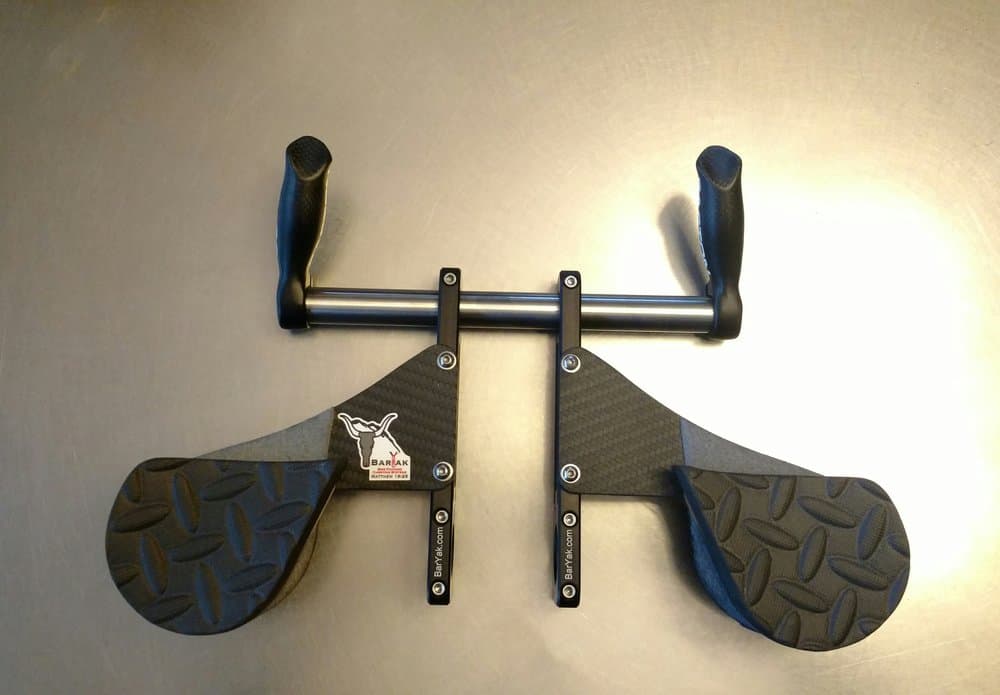
These are cool aero bars that are specifically designed for bikepacking in mind.
Some of the bars features include:
- Stress-tested to 150lbs.
- Rails CNC machined from aluminium billet and anodized
- Carbon fiber bar ends, tube and arm rest. The bar ends also adjust to suit your riding style and comfort.
- Weight of complete system, 450gm. or 15.75oz.
- Heaps of room for accessories and gadgets
Jones Gnarwhal
A single bar end that fits to the Loop bar. It will make your bikepacking rig look like a unicorn or a rhinoceros.
If you are going to go with this option it is wise to add extra foam under your handlebar tape, to give more comfort to your elbows.

Mounting Aero Bars to 25.4 mm handlebars for Bikepacking
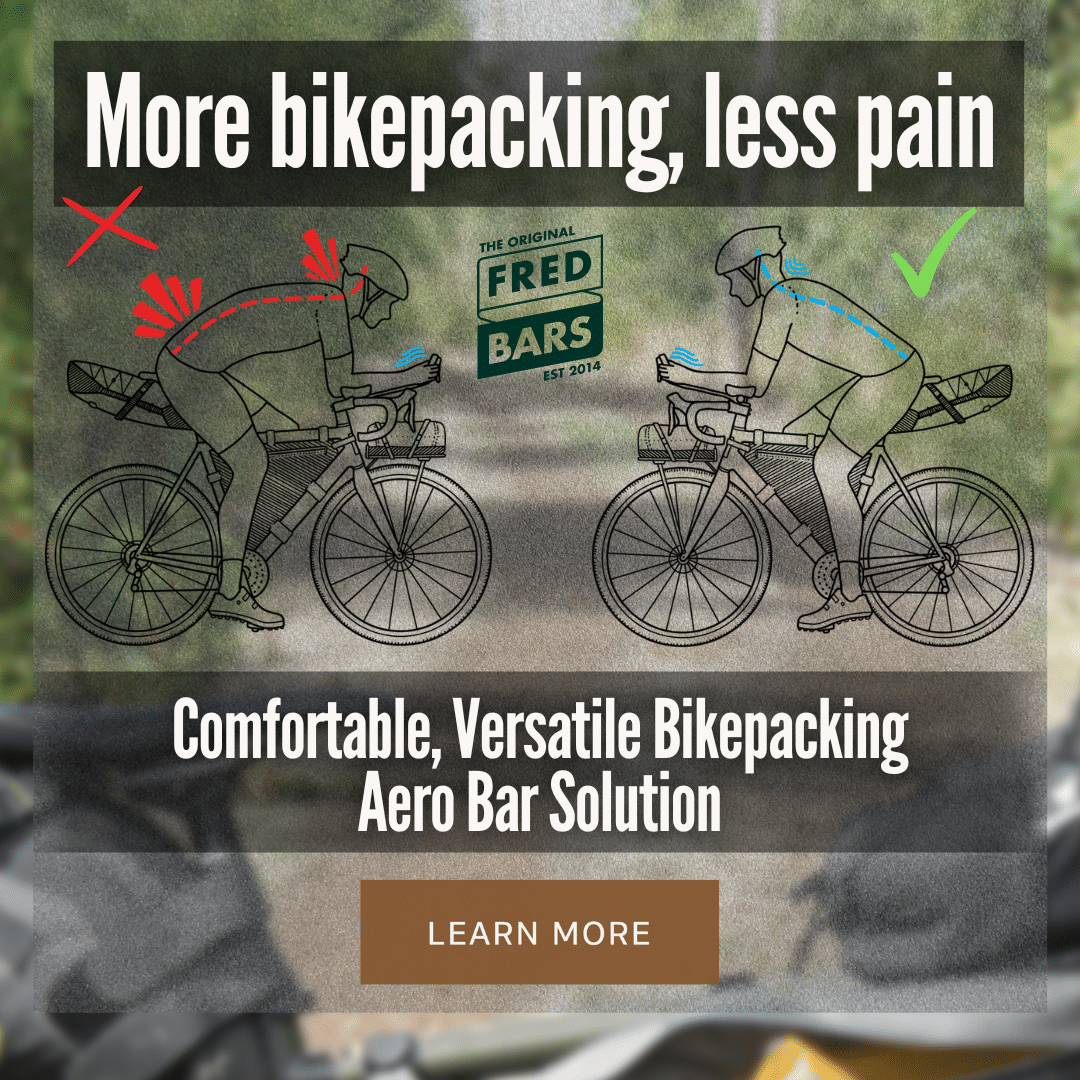
Riser Bar + Aero Bars (Try Fred Bar Steerer Mounting Kit)
There was some problems with riser bar setup and aero bars, Thanks to the Small Tomatoes Bikepacking Blog. “The “riser” part of Riser Bar meant that there was an awkward change in shape and diameter of the handlebar when I went to mount aero bars on either side of my stem. The aero bars were never really tight enough as there was always a gap in contact, and one bar was forever pointed a little to the right…. SO uncool.”

A solution?
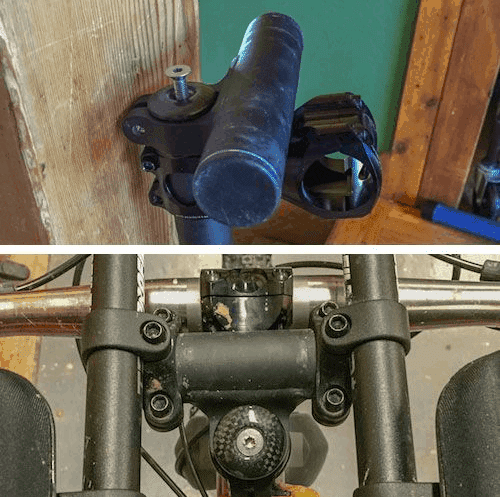
Try Fred Bar Steerer Mounting Kit puts your aero bars directly above your stem. And could provide as a solution for awkward handlebar setups. This kit was designed for flat bar handlebars to accommodate aero bars. But also are great for allowing you to remove them with very little difficulty.
The Fred Bar kit works well if you have 25.4 mm mountain bike handlebars allowing you to fit aero bars to basically any setup.
A Fred Bar Steerer seems like a better solution than mounting aero bars directly onto your handlebars anyway, as they raise you up and back.
Also before committing to buying this mounting kit make sure you have enough room of the steer tube above the stem. Requiring 15mm of steerer to clamp down on.
Update:
I’ve been testing out the Fred Bars and I use my aero bars all the time now! Raising the aero bars and bringing them back, results in less reach allowing you to rest in a more relaxed, crouched position.
one issue I have always run into with aero bars for bikepacking is how much stretching happens. Resulting in discomfort and I just never end up spending that much time in the aero bars while riding!
Until now!

This product is the perfect solution to aero bar comfort!
Try DIY Mounting Option for 25.4 mm Handlebars
Thebidon shows us how you can fit a standard aero bar that is made to fit 31.8 mm on a 25.4 mm bar.
Recommended Aero Bars For Bikepacking
Profile Design T+ Series – 500 grams
RedShift Switch Aero System – Carbon 564g
Pro Missile S-Bend – 484 grams
Syntace C3 Aerobars
BarYak Expedition – 484 grams
How High Should Your Aero Bar Setup Be?
When fitting your aero bars for a bikepacking or touring setup it is best to have them setup a few centimetres higher then your saddle is. As you want a more upright positioning, that is not too upright but low enough that you
Aero Bars and Bikepacking Bags
Bikepacking Bags
Most all bikepacking bags should fit quite easily to a aero bar bikepacking setup. Fitting underneath the aero bars.
But more traditional touring bike handlebar bags would be more difficult if not impossible to fit to a aero bar setup.
DIY Hacks
- 2 Rok straps and a dry bag, seems like a simple solution to finding Aero bar handlebar bag options.
- You could also use a fanny pack and wrap it around the aero bars. As a smaller storage solution and option.
Handlebar Bag Design specifically for Aero Bars

Apidura Racing Handlebar Pack
The bag has 4 velcro loop style rings that each wrap around the aero bar, with an additional velcro strap that to the stem of the bike. This design seems to be able to keep this bag very steady. As it is designed with long distance competition in mind.

The bag also offers two storage points for water bottles which is a well thought out feature of the bag.
Joseph Road 16,000 Km Around Australia on a Fixie with Aero Bars
Profile Design T4+ Aero Bars on his setup around Australia
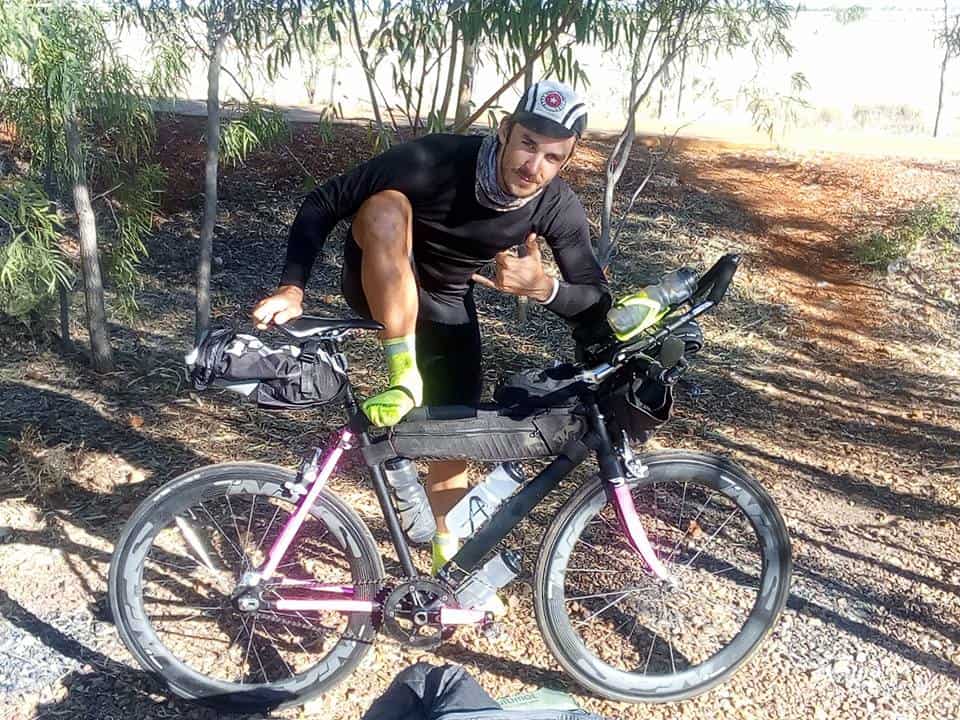
I had the great pleasure of meeting this ultra distance bike adventurer when I cycled through London on a recent bicycle tour. He is a legend, this is what he had to say about using aero bars on his bikepacking setup.
I found aerobars to be a great addition to my bike. My hands tend to get tired and sore for long stints using hoods and I felt like I wasn’t sacrificing speed to be in a more comfortable position unlike riding on the tops. When you have them set-up in a more relaxed way, for bikepacking, they add another valuable position for you to ride in. They completely take pressure off of your wrists and hands which can suffer badly over days and weeks of long days in the saddle.
As long as you’ve not get them in too much of an aggressive position, you probably won’t suffer from a painful neck or back strain. They also add some extra space for you to attach bags and gadgets which come in very handy. I had my front light, a large dry bag with clothes and a bottle cage and water bottle on my TT bars. And, of course, there are the aero gains. They are probably very mild while a bunch of luggage is strapped to a bike but every little gain still counts – even if it’s just psychologically, which is a massive deal whilst riding for hours on end with big distances to cover.
I had mine adjusted so they were as widely spaced as my base bar would allow and with the front ends angled upwards. This is debatably more aerodynamic (there are rules to not allow this position in professional cycling so that’s why you don’t see it) and I believe also puts less stress on your upper body as the pads more directly counteract your weight instead of having to more tightly grip the bars to stop yourself sliding forwards.
I also used the thickest pads I could find to reduce road buzz and increase longevity and used some rubber BMX grips count down to length on the tips of the extensions to further increase dampening and grip. I’d highly recommend anyone riding a tour or some big days to add them to your set-up. Make sure they are in a suitable position though, you don’t want to be too crunched up and actually become a detriment to your comfort.

These aero bars allow for adjustability for the armrest and arm position.
Aero bars for bikepacking is a great way to get that little bit extra comfort. It looks kind of cool, giving you many other riding positions and hand positions. Would love to know if you are currently using aero bars on your bikepacking or touring bike setups? Or plan to get some for your next adventure? Let me know in the comment section.
About The Author